Setting up your Raspberry Pi hardware
We suggest two different ways for setting up your hardware: Acquire and burn a pre-configured raspian image provided by us on your SD card OR use the NOOBS installer that comes with your SD card. If you were to use the pre-configured image, you will spend more time outside labs (acquiring and burning the image on your SD card) and less time in labs configuring and testing it. If you used the NOOBS installer, you don’t have to do any outside lab prep, but will need more time in lab (approximately 1 hour) to install Raspian, configure it and also install other packages that you need. You may also do some of these steps at home if you have access to a keyboard, mouse and monitor or TV. Choose the method that you prefer. In general I would recommend option 2, unless you find that the labs are too busy. Before starting, check that you have all the hardware items included in your raspberry pi kit. For more information see this page on a description of components. Here is a list of items that you will need:
-
the Pi motherboard: The processor and peripherals. We recommend the Pi 3. If you have any of the older models, that works too but you will additionally need a wifi dongle.
-
Power supply: Turns the Pi “ON” when connected to it. There is no “ON” button on the Pi
-
Raspberry Pi cover: Protects your motherboard (you don’t have to use it if you want the hardware visible to you. Just make sure you keep the Pi in the electrostatic shield cover that it comes in when you are not using it!)
-
HDMI Cable: Connects your Pi to a monitor or TV. It cannot be used to connect it you laptop computer
-
Micro SD card and SD card cover: Stores all the software for the raspberry Pi including the Raspian OS
-
USB micro SD reader: Use this to reimage your SD card with the pre-configured image provided by us
Option 1: Setup the hardware using our pre-configured Raspian image
Acquire the image file
The compressed (zipped) version of the pre-configured Raspian image is available on ieng6 in the folder /home/linux/ieng6/cs30f/public/hw_image/2016-05-27-raspbian-jessie.img.zip (1.56GB).
The SHA-1 for the zip file is: d7aa6f606197a4891a73a77cc7912fc322ade540
Depending on the speed of your internet connection, copying the image file to your local machine over the network may take a while. To copy the file use scp or any other file transfer protocol. If your laptop provides a bash environment and scp run the following command.
scp cs30fxx@ieng6-241.ucsd.edu:/home/linux/ieng6/cs30f/public/hw_image/*.zip ./
-
Unzip the
.zipfile to get a 3.74 GB.imgfile: 2016-05-27-raspbian-jessie.img -
If you have a virtual emulation environment available on your local machine, run the image within your virtual environment to customize it.
$ docker run -it --rm --privileged=true -v /Users/diba/git/emulate-pi-docker/images:/usr/rpi/images -w /usr/rpi -h localhost ryankurte/docker-rpi-emu /bin/bash -c './run.sh images/2016-05-27-raspbian-jessie.img /bin/bash'
If you are relying on the virtual environment on ieng6, do the next section on customizing your image after burning the image on the SD card.
Customize the image
If you are running Raspian on the actual hardware, open a terminal on your Raspian desktop to obtain a command line prompt. If you are within a virtual environment you should already be at the command line within Raspian.
- Add in your WiFi credentials for UCSD-PROTECTED
Open the file /etc/wpa_supplicant/wpa_supplicant.conf. You may use either nano or vi to open the file as follows:
sudo nano /etc/wpa_supplicant/wpa_supplicant.conf
The wpa_supplicant.conf file has the following content:
ctrl_interface=DIR=/var/run/wpa_supplicant GROUP=netdev
update_config=1

network={
        ssid="UCSD-PROTECTED"
        proto=RSN
        key_mgmt=WPA-EAP
        pairwise=CCMP
        auth_alg=OPEN
        eap=PEAP
        identity=""
        password=""
        phase2="auth=MSCHAPV2"
}
Set the identity and password fields using your Active Directory OR cs30f account credentials. Save and close the file.
- Change the hostname and password for the user “pi” as follows:
- Open the raspi-config configuration tool:
$ sudo raspi-config
You will see the following screen:
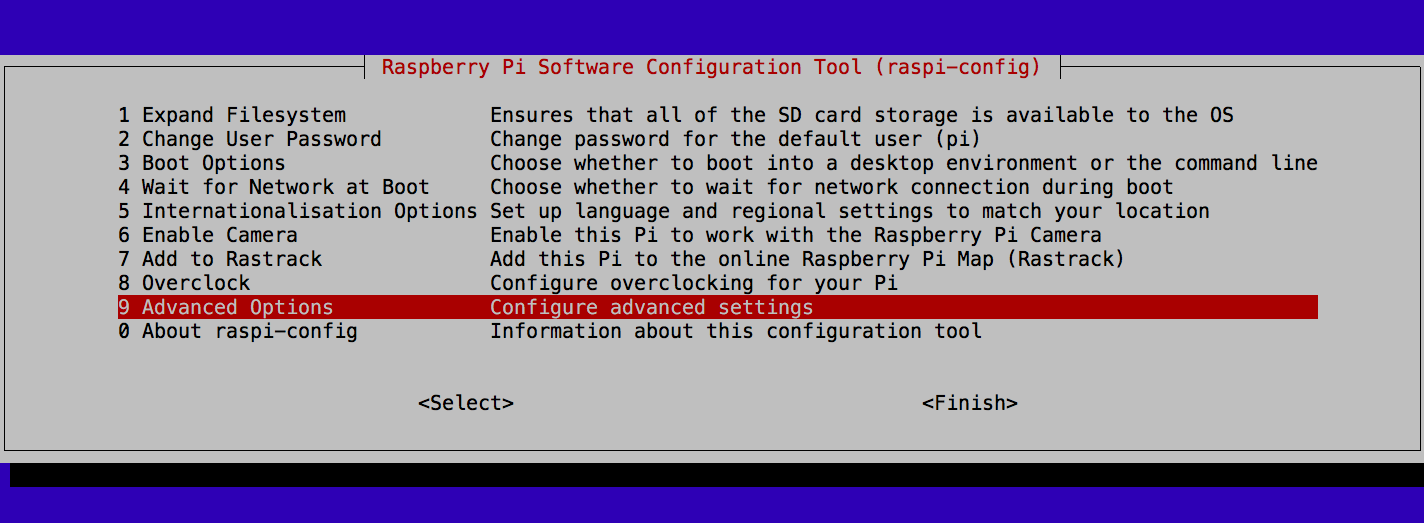
- Use the down arrow key to navigate to the “Advanced Options”. Select by pressing enter. You should see the following screen
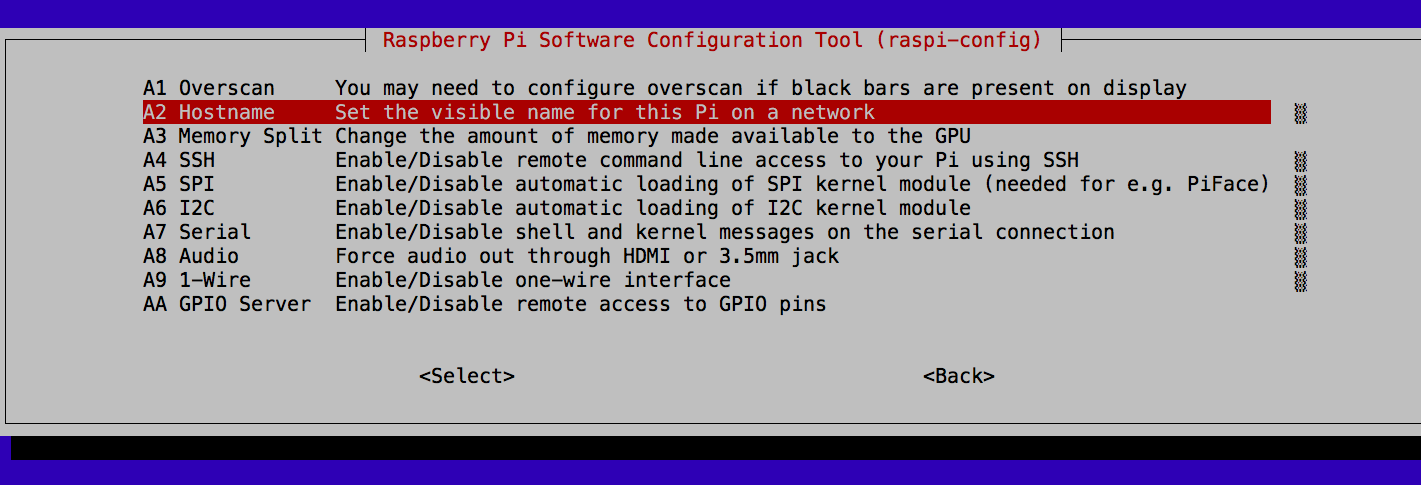
- Press enter twice to arrive at the following screen:
-
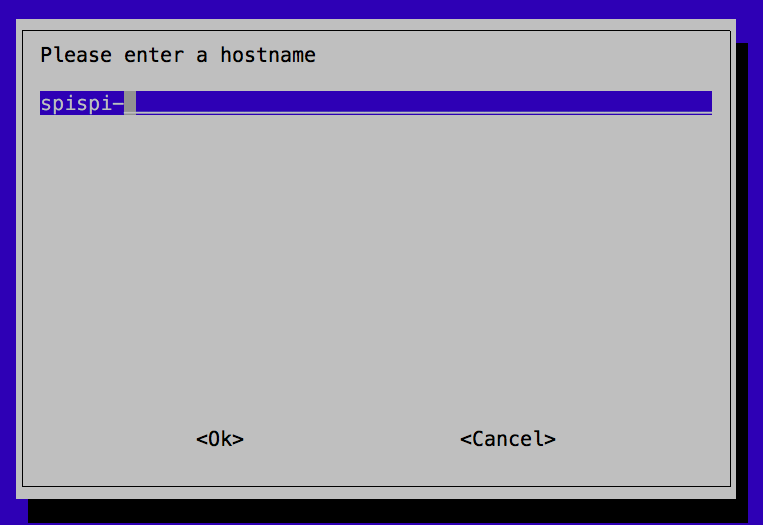
Change the hostname to something unique with the prefix
spispi. In the default hostname, replace the letters xy71 by the last two letters of your cs30f account and a two digit number. Take note of the hostname. -
Change the password for the user “pi”. The default password is “raspberry”. You must change your password, by going to the main menu of the raspi-config tool and selecting the “Change User Password” and following the prompt to set a new password.
This completes the customization of your Pi image. If you are in docker, type exit to leave your virtualized Pi environment.
Burn the image on your SD card
Acquire the software to burn images
To burn the image you may use the command line or other sofware. Here are our recommendations depending on what OS you have:
-
MAC OSX: Download and install Apple Pi Baker.
-
Windows: Install Win32DiskImager and additionally read this tutorial. Note that Win32DiskImager may already be available in your version on windows, search for it before trying to install.
-
Linux: Use the command line, refer to this tutorial
Burn the image
-
Insert the micro SD card into the USB micro card reader.
-
Insert the USB card reader into the USB port of your laptop.
-
Take note of the drive name that your SD card appears as on your computer
-
Use any of the disk imaging tools introduced earlier to burn the 2016-05-27-raspbian-jessie.img on your SD card. This may take 10 to 15 minutes.
You are now ready to boot the Pi in desktop mode and verify your setup. To do this you must be physically present at one of the “Pi” stations in the B230 lab where you have access to a keyboard, monitor and mouse.
Boot up your Pi on a “Pi station”
Go to any of the ten “Pi stations” in the lab. Here you will have access to a keyboard, monitor and mouse. To run your Pi as a desktop computer, follow these steps.
-
Connect the keyboard and mouse to any two USB ports on your Pi.
-
Connect the monitor to the Pi using the hdmi cable.
-
Insert the micro SD card into the Pi (take help from a tutor if you don’t know how to do this)
-
Connect the power supply to your Pi to turn it on. The Pi should start booting up with messages scrolling on your monitor.
-
After the Pi boots up, you should see a graphical desktop. If you see a login prompt instead, enter the credentials for the user “pi”. The default password is “raspberry”, however, if you have customized your image file already, your password should be something different. If you see a command prompt enter
sudo startxto get to the graphical desktop. -
If you have not customized your image yet, return to the earlier section on customizing your image. Then return to this step and restart your Pi by typing the following in a terminal window
$ sudo shutdown -r now
- Check your network connectivity following these instructions If you were able to connect to UCSD-PROTECTED and got a global IP, then congratulations! You are pretty much done and only need to try connecting to your Pi remotely following this tutorial. If you were not able able to connect to UCSD-PROTECTED, check that you have the right Wifi configurations in your /etc/wpa_supplicant/wpa_supplicant.conf file. If you still can’t connect, that’s fine. You should be able to connect over UCSD-GUEST, install any packages that you need and use git. You would only be limited in connecting remotely to your Pi on the UCSD network. Consider setting up your Pi as a server on your home WiFi network following this tutorial on weaved. Note that the free plan on weaved only allows for 30-minute connection times per ssh session.
Option 2: Install Raspian using the NOOBS installer
If you have bought the Raspberry Pi 3 kit, your SD card already has the NOOBS installer on the SD card. To do the next steps you must be physically present at a “Pi station” in the labs where you have access to a keyboard, monitor and mouse. Follow these steps
-
Step 1: Connect the keyboard and mouse to any two USB ports on your Pi.
-
Step 2: Connect the monitor to the Pi using the hdmi cable.
-
Step 3: Insert the micro SD card into the Pi (take help from a tutor if you don’t know how to do this)
-
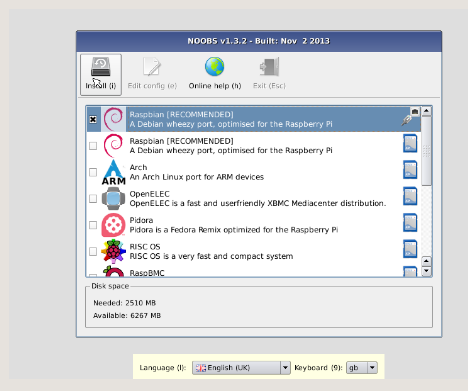
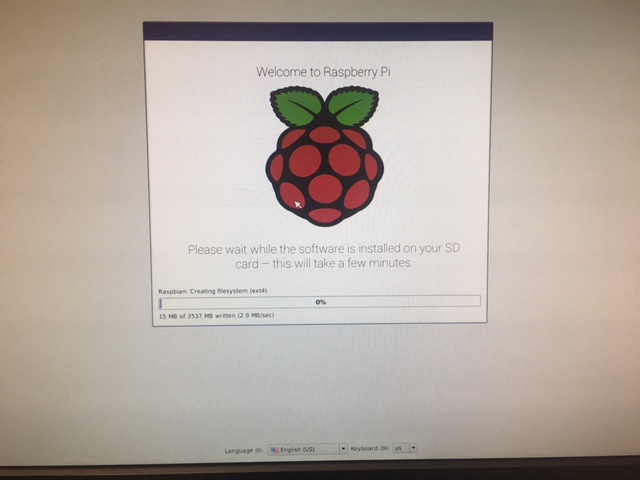
Step 4:Connect the power supply to your Pi to turn it on. You should see the NOOBS installer screen:
-
Step 5: Select “Raspian” as the OS, Language “English US” and Keyboard as “us”. Then click on “Install”.
-
It will take 10 to 15 minutes for Raspian to install
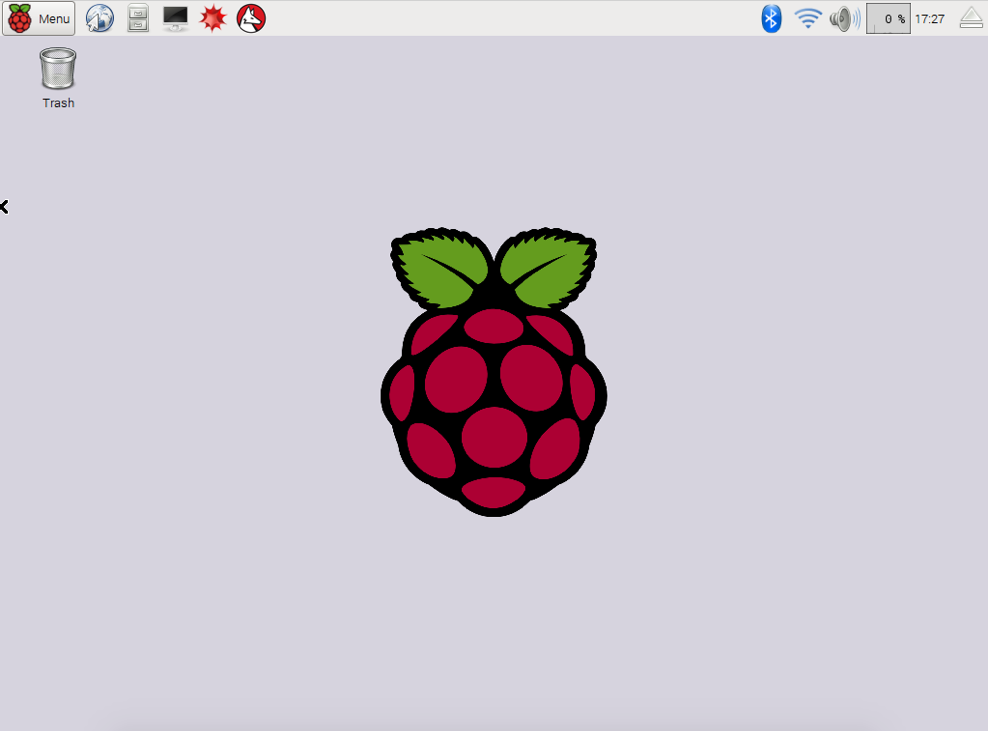
- Once Raspian boots up you should see a graphical desktop interface. Most likely you won’t be connected to WiFi, and won’t be able to view the WiFi icon on the top right. Your desktop view should be similar to the one shown below:
-
Step 6: Connect to UCSD-GUEST: Click on the icon on the top-right corner and select UCSD-GUEST. Then click on the browser icon on the top left corner (right next to the Menu). Accept the terms to connect to the UCSD-GUEST network.
-
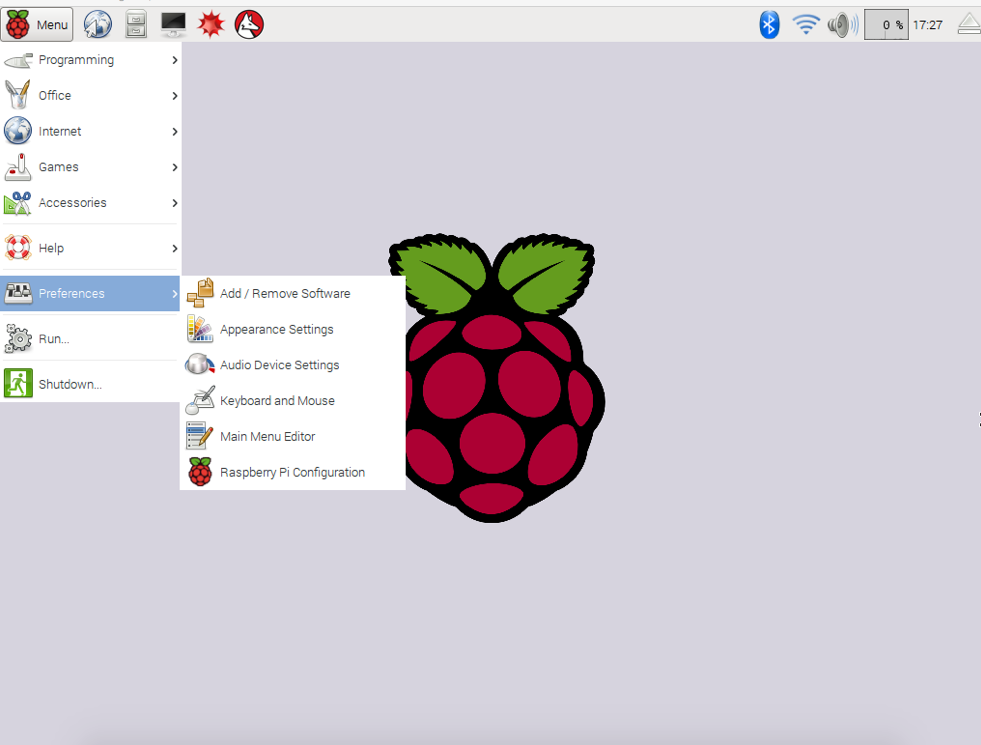
Step 7: Configure Raspian using the graphical configuration tool. Go to Menu->Preferences-> Raspberry Pi Configuration. See image below:
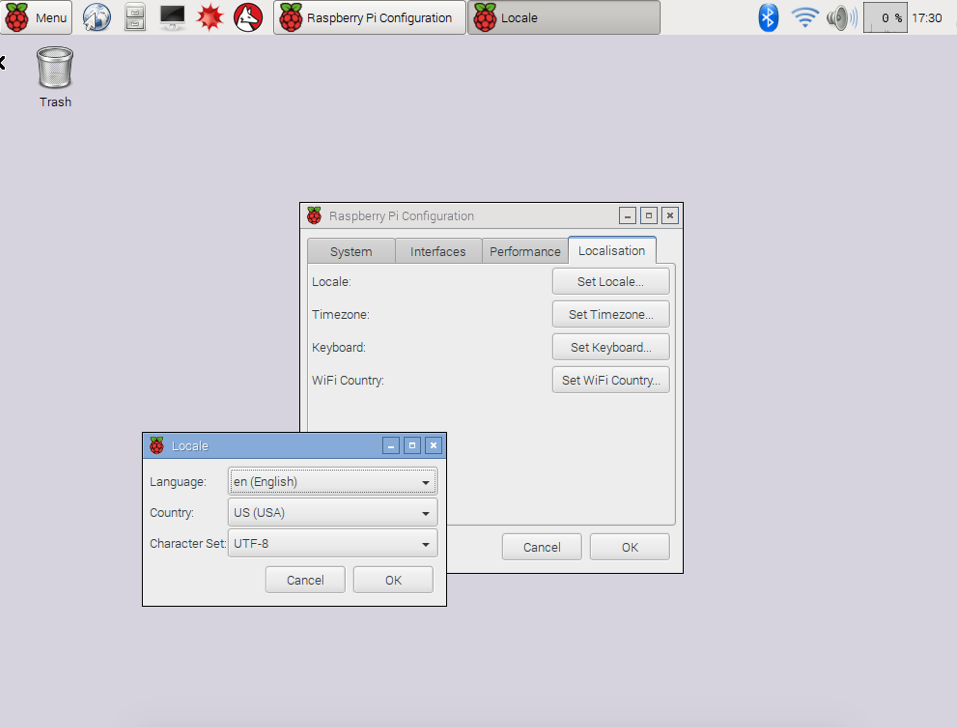
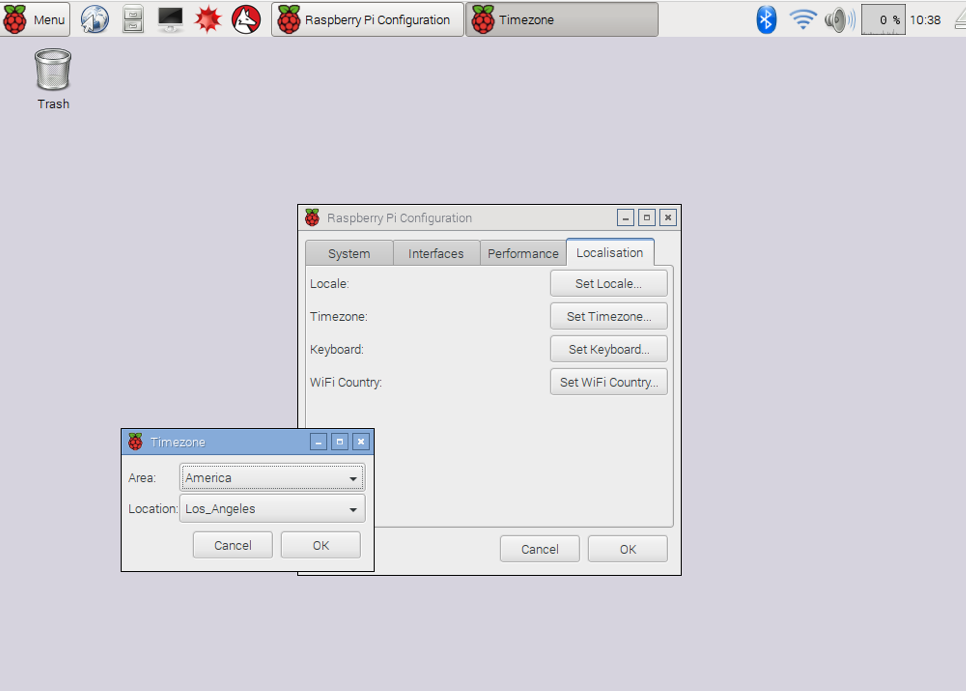
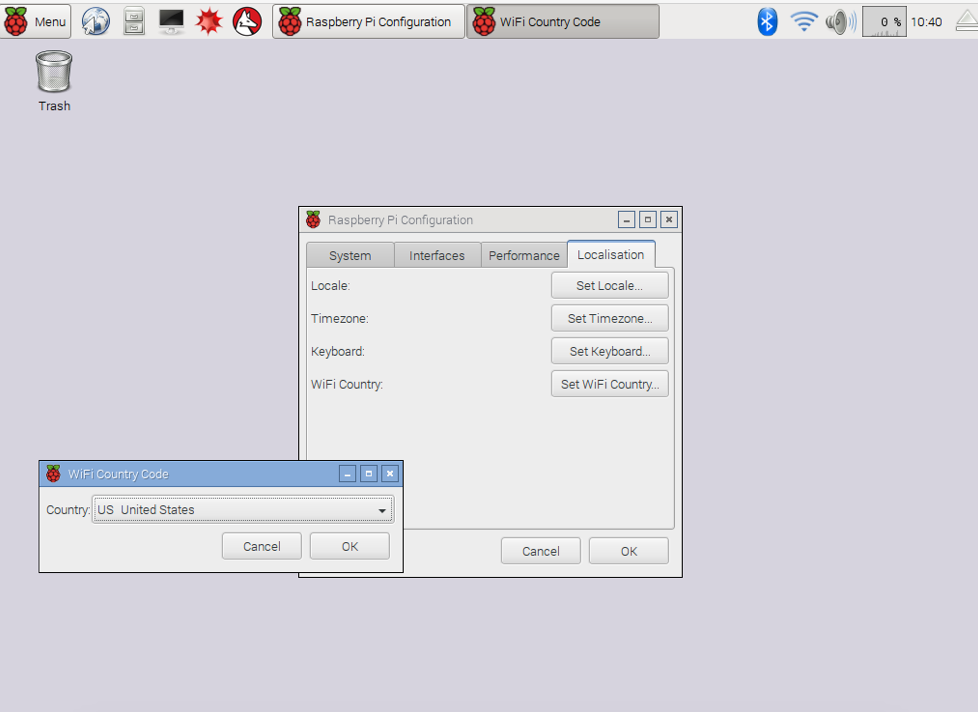
- Step 7a: Click on the “localisation” tab: set your locale, timezone, and Wifi country as follows:
-
Step 7b: Click on the “System” tab - expand your filesystem, change the password for user pi, and change your hostname. Your hostname should be something unique with the prefix
spispi. For example one possible hostname isspispis-xy72, whey xy is the last two letters of your cs30f account and 72 is some random number. Just make sure you are choosing a unique name and take note of it. Click okay to save the configurations. You will be asked if you would like to reboot your machine. Say “no”. We will reboot the Pi after making the configurations to connect to UCSD-PROTECTED. -
Step 7c: Open a terminal by clicking on the terminal button on the top left corner. Make sure you have Wifi connectivity over UCSD-GUEST.
-
Run a software update on your pi.
$ sudo apt-get update
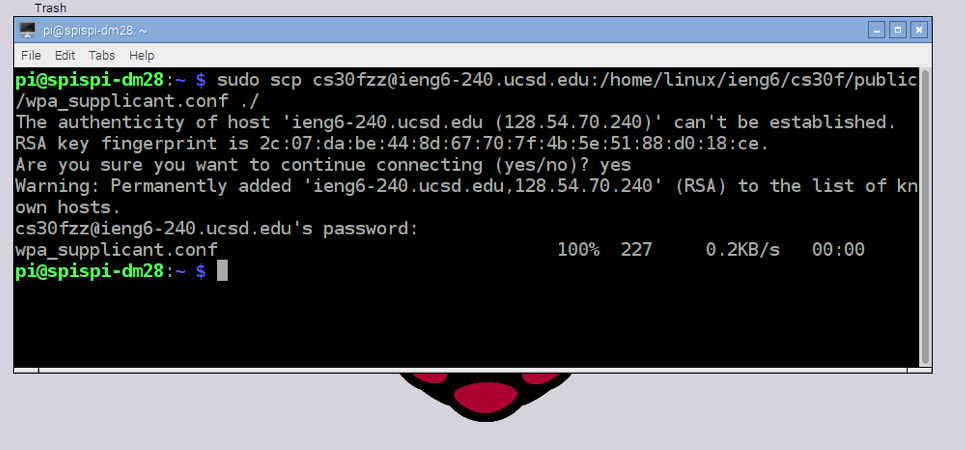
- Step 7d: Get a sample Wifi configuration file from the ieng6 server following these steps:
pi@spispi-dm28:~ $ scp cs30fzz@ieng6-240.ucsd.edu:/home/linux/ieng6/cs30f/public/wpa_supplicant.conf ./
Follow the prompts to transfer the sample file
Open the file in vi or nano and enter your wifi credentials, refer to the “Customize your image” section above
Make a backup of your existing configuration file and replace the old config file with the new file
$ sudo mv /etc/wpa_supplicant/wpa_supplicant.conf /etc/wpa_supplicant/wpa_supplicant.conf.backup
$ sudo mv ./wpa_supplicant.conf /etc/wpa_supplicant/wpa_supplicant.conf
- Step 8: Restart your pi
$ sudo shutdown -r now
-
Step 9: Once the Pi boots up, open a terminal and check your network connectivity following these instructions. If you were able to connect to UCSD-PROTECTED and got a global IP, then congratulations! You are pretty much done and only need to try connecting to your Pi remotely following this tutorial. If you were not able able to connect to UCSD-PROTECTED, check that you have the right Wifi configurations in your /etc/wpa_supplicant/wpa_supplicant.conf file. If you still can’t connect, that’s fine. You should be able to connect over UCSD-GUEST, install any packages that you need and use git. You would only be limited in connecting remotely to your Pi on the UCSD network. Consider setting up your Pi as a server on your home WiFi network following this tutorial on weaved. Note that the free plan on weaved only allows for 30-minute connection times per ssh session.
-
Step 10: If you are able to connect remotely to your Pi, free up the Pi station for someone else to use. Leave your Pi plugged into the power outlet and remove all other connections. ssh into your Pi from a lab machine or laptop and then install these useful packages (git, gvim, tightvncserver for remote desktop, and weaved (just in case you have trouble with UCSD-PROTECTED (see more here ):
$ sudo apt-get install git

$ sudo apt-get install vim-gui-common

$ sudo apt-get install vim-gtk

$ sudo apt-get install tightvncserver

$ sudo apt-get install xrdp

$ sudo apt-get install weavedconnectd

$ sudo weavedinstaller